INSTALLATION
Index
- Introduction
- Creating new user and new company on Admin Panel
- Downloading WebInStats SDK and adding to the WebSite/Apps
- Create FCM and HMS Configurations for Android Applications
- Adding Push Notification to Web Site and Apps
- iOS 10 Rich Push Notifications
- Customizing default parameters
- Sending extra parametres
- Inline Banner Integration on Apps
- Customizable functions for your apps
- Activating preview mode on Apps
Introduction
You should follow the steps below to activate WebInStats SDK on your WebSites/Apps. You can see steps for Android, iOs and Web on separated tabs.
Creating new user and new company on Admin Panel
If you don’t have WebInStats account You should create one. You can click here to create a new account. You can activate your account by clicking the activation link on the email. Now you can create a new company using New button on Create New Company page. You should type the information below.
- Name : Please type your company name
- Sub Domain : We create a subdomain to track your clicks.Subdomain must be similiar to your domain name. No special characters allowed. If your domain name is www.example.com you can type example here.
- Web Site : You should type your WebSite URL here.
- Time Zone : You should select your Time Zone. F.I. for Turkey you can select Europe/Istanbul, For London you can select Europe/London.
- Character Set : You should select your WebSites’ character set. It’s 99% utf-8. But if you use different character set you should learn from your web master.
Downloading WebInStats SDK and add to the WebSite/Apps
If you create the company record successfully you must be sure that you company is selected on the left menu -> Select Application section. If you company is selected please select Admin Panel on the same section.
Downloading SDK and sample scripts
Firstly, You should download SDK (for Apps) or get the script code (for website) :
Web
Please go to Admin Panel -> Left Menu -> General Settings -> Generate Code. Copy the code in the page then follow the steps below.
Android
Android SDK runs on Android v4.2 (API 17) and above.
You can download Android SDK using the link below :
https://github.com/WebInStats/Android-SDK
For sample Android demo app :
iOS
iOS SDK runs on iOS v8.0 and above.
You can download iOs SDK using the link below :
https://github.com/WebInStats/iOS-SDK
For sample iOs demo app :
Appliyng WebInStats scripts to the WebSites/Apps
Web
Please copy this code to all of the pages on your website before the </body> tag. (Also you can add the code to the Tag Manager)
<script>
window.wiso = window.wiso || [];
window.wiso.push(
 {s:"__YOUR_COMPANY_ID___"},
 {_cburl:"//__YOUR_SUBDOMAIN__.webinstats.com/"},
 {p:"__THE_PAGENAME_USER_CURRENTLY_VISIT__"},
 {cuid:"__CUSTOMER_ID__"}, // LEAVE THIS EMPTY IF USER IS NOT LOGGEDIN
// TWO PARAMETERS BELOW SHOULD BE ON THE PURCHASE PAGE
 {trid:"__UNIQUE_TRANSACTION_ID__"}, // LEAVE THIS EMPTY IF IT'S NOT PURCHASE PAGE
 {am:"__TRANSACTION_AMOUNT__"} // LEAVE THIS EMPTY IF IT'S NOT PURCHASE PAGE
);
(function() {var _wis = document.createElement('script');_wis.type = 'text/javascript';_wis.async = true;
_wis.src='//dbfukofby5ycr.cloudfront.net/a9/js/dlc1.50.js';var s = document.getElementsByTagName('script')[0];
s.parentNode.insertBefore(_wis, s); })();
</script>
Android
Add the line below to AndroidManifest.xml file :
<uses-permission android:name="android.permission.INTERNET"></uses-permission>
Complete the following steps in each activity of your application:
import webinstats.android_wis.Webinstats;

// define wiso object as a global object :
Webinstats wiso = new Webinstats("//__YOUR_SUBDOMAIN__.webinstats.com/","__YOUR_COMPANY_ID___","0");
// If you use activity, you must call execute method on onCreate() method in each activity

// If you use fragment activity, you must call execute method on onCreateView() method in each fragment
Map<String,String> map=new HashMap<>();
map.put("p","__THE_PAGENAME_USER_CURRENTLY_VISIT__");
map.put("cuid","__CUSTOMER_ID__"); // LEAVE THIS EMPTY IF USER IS NOT LOGGEDIN
// TWO PARAMETERS BELOW SHOULD BE ON THE PURCHASE PAGE
map.put("trid","__UNIQUE_TRANSACTION_ID__"); // LEAVE THIS EMPTY IF IT'S NOT PURCHASE PAGE
map.put("am","__TRANSACTION_AMOUNT__"); // LEAVE THIS EMPTY IF IT'S NOT PURCHASE PAGE

// For each activity => call execute function on onCreate() method
wiso.execute(this,map);
// For each fragment activity => call execute function on onCreateView() method F.I. :
wiso.execute(getActivity(),map);
Add the code below to each activities onDestroy method or each Fragment onDestroyView method:
// For each activity => call execute function on onDestroy() method
wiso.onChangeState(this);
// For each fragment activity => call execute function on onDestroyView() method F.I. :
wiso.onChangeState(getActivity());
// Your app is targeting API level 28 (Android 9.0) or above, you must include the following declaration within the element of AndroidManifest.xml.
<uses-library
      android:name="org.apache.http.legacy"
      android:required="false" />
iOS / Swift
Paste the code below for each viewcontroller on your app
// You should add Allow Arbitrary Loads = YES under App Transport Security Settings in info.plist file to use the SDK.
// To access methods from SDK in your Swift file add the following line to the begining of the class.
import iOS_wis
// Add the code below for each viewDidLoad() method on viewcontroller

let wiso = Webinstats("//__YOUR_SUBDOMAIN__.webinstats.com/","___YOUR_COMPANY_ID___","0")
var map = [String:String]()
map["p"] = "__THE_PAGENAME_USER_CURRENTLY_VISIT__"
map["cuid"] = "__CUSTOMER_ID__" // LEAVE THIS EMPTY IF USER IS NOT LOGGEDIN
// TWO PARAMETERS BELOW SHOULD BE ON THE PURCHASE PAGE
map["trid"] = "__UNIQUE_TRANSACTION_ID__" // LEAVE THIS EMPTY IF IT'S NOT PURCHASE PAGE
map["am"] = "__TRANSACTION_AMOUNT__" // LEAVE THIS EMPTY IF IT'S NOT PURCHASE PAGE
wiso.execute(view: self, localmap: map)
iOS / Objective-C
// You should add Allow Arbitrary Loads = YES under App Transport Security Settings in info.plist file to use the SDK.
// To access methods from SDK in your Objective-C file add the following line to the begining of the class.
@import iOS_wis
// Add the code below for each -(void)viewDidLoad method on viewcontroller
Webinstats* wiso = [[Webinstats alloc] init:@"//__YOUR_SUBDOMAIN__.webinstats.com/" :@"___YOUR_COMPANY_ID___" :@"0"];
NSMutableDictionary *map = [[NSMutableDictionary alloc] init];
[map setObject:@"__THE_PAGENAME_USER_CURRENTLY_VISIT__" forKey:@"p"];
[map setObject:@"__CUSTOMER_ID__" forKey:@"cuid"]; // LEAVE THIS EMPTY IF USER IS NOT LOGGEDIN
// TWO PARAMETERS BELOW SHOULD BE ON THE PURCHASE PAGE
[map setObject:@"__UNIQUE_TRANSACTION_ID__" forKey:@"trid"]; // LEAVE THIS EMPTY IF IT'S NOT PURCHASE PAGE
[map setObject:@"__TRANSACTION_AMOUNT__" forKey:@"am"]; // LEAVE THIS EMPTY IF IT'S NOT PURCHASE PAGE
[wiso executeWithView:self localmap:map];
Create FCM and HMS Configurations for Android Applications
Firebase Cloud Messaging Configuration →
1. Create a project for Android Application
2. Add the app package name and save the configuration file.
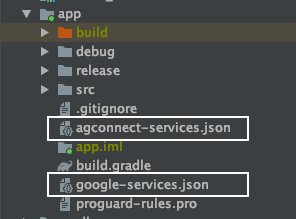
3. Download config file (google-services.json)
4. Move the downloaded google-services.json file to the app directory of your Android Studio project.
5. Add all the following build dependencies to dependencies:
Project-level build.gradle (/build.gradle):
buildscript {
  repositories {
    // You should add the following line
    google()  // Google's Maven repository
  }
  dependencies {
    ...
    // Add this line
    classpath 'com.google.gms:google-services:4.3.3'
  }
}
allprojects {
  ...
  repositories {
    // You should add the following line
    google()  // Google's Maven repository
    ...
  }
}
App-level build.gradle (//build.gradle):
dependencies {
implementation 'com.google.firebase:firebase-messaging:20.1.2'
}
apply plugin: 'com.google.gms.google-services'
Huawei Push Messaging Configuration →
Please follow the instructions on the link : Preparations for Integrating HUAWEI HMS Core.
1. Create an app in AppGallery Connect.
2. Generate a signing certificate.
3. Generate a signing certificate fingerprint.
4. Configure the signing certificate fingerprint.
5. Add the app package name and save the configuration file.
6. Download config file (agconnect-service.json)
7. Move the downloaded agconnect-services.json file to the app directory of your Android Studio project.
8. Add all the following build dependencies to dependencies:
Project-level build.gradle (/build.gradle):
buildscript {
    repositories {
        // You should add the following line
        maven { url 'http://developer.huawei.com/repo/' } // HUAWEI Maven repository
    }
    dependencies {
        // Add the following line
        classpath 'com.huawei.agconnect:agcp:1.2.0.300'  // HUAWEI agcp plugin
    }
}

allprojects {
    repositories {
        // You should add the following line
        maven { url 'http://developer.huawei.com/repo/' } // HUAWEI Maven repository
    }
}
App-level build.gradle (//build.gradle):
// You should add the following lines
apply plugin: 'com.huawei.agconnect'  // HUAWEI agconnect Gradle plugin


dependencies {
implementation 'com.huawei.hms:push:4.0.0.300'
implementation 'com.huawei.agconnect:agconnect-core:1.0.0.300'
}
WebInStats Panel Configuration →
At the end of configurations, for FCM you will see SenderID and Server Key, for HMS you will see APP ID and APP Secret Key. Those values must be added WebInStats Push Stats Panel
For FCM → enter your SenderID to FCM SenderID Field and enter your FCM Server Key to FCM Server Key Field in Push Stats –> Android Push Settings Section
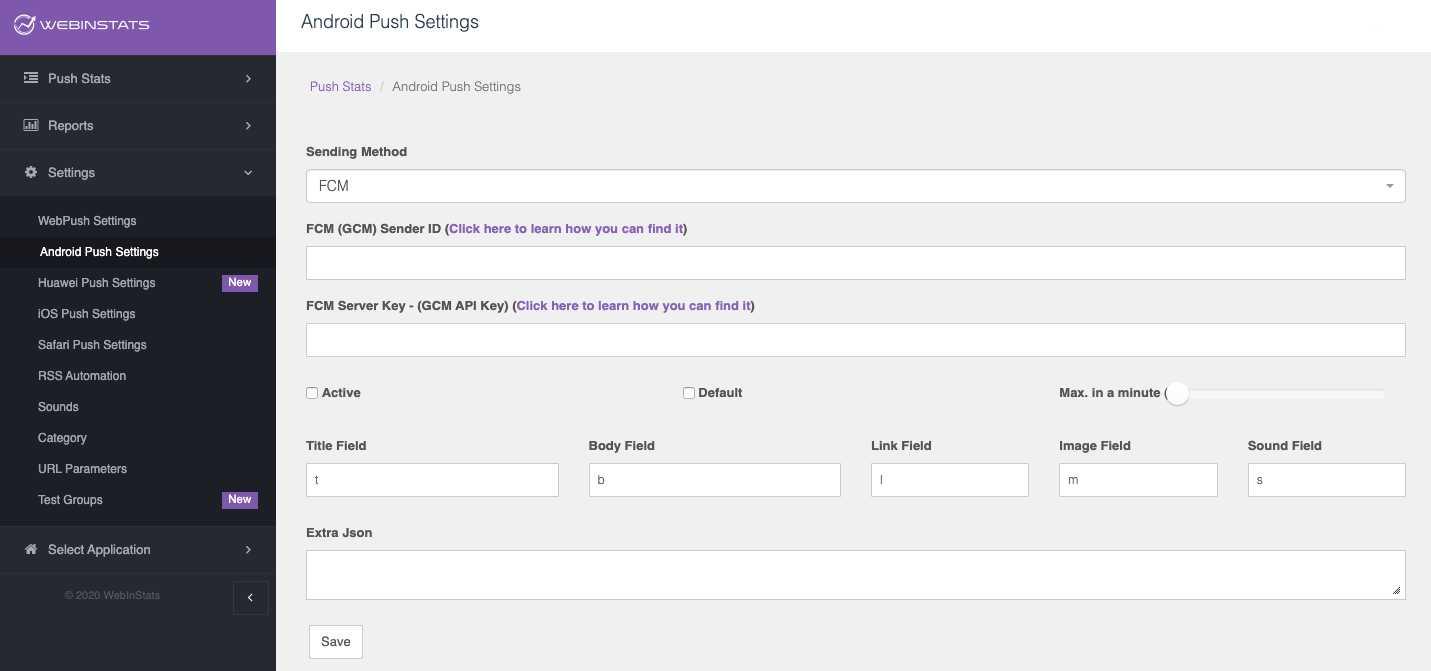
then , you should check active and save your configurations
For HMS →enter your APP ID to Client ID Field and enter your App Secret to Client Secret Field in Huawei Push Settings Section
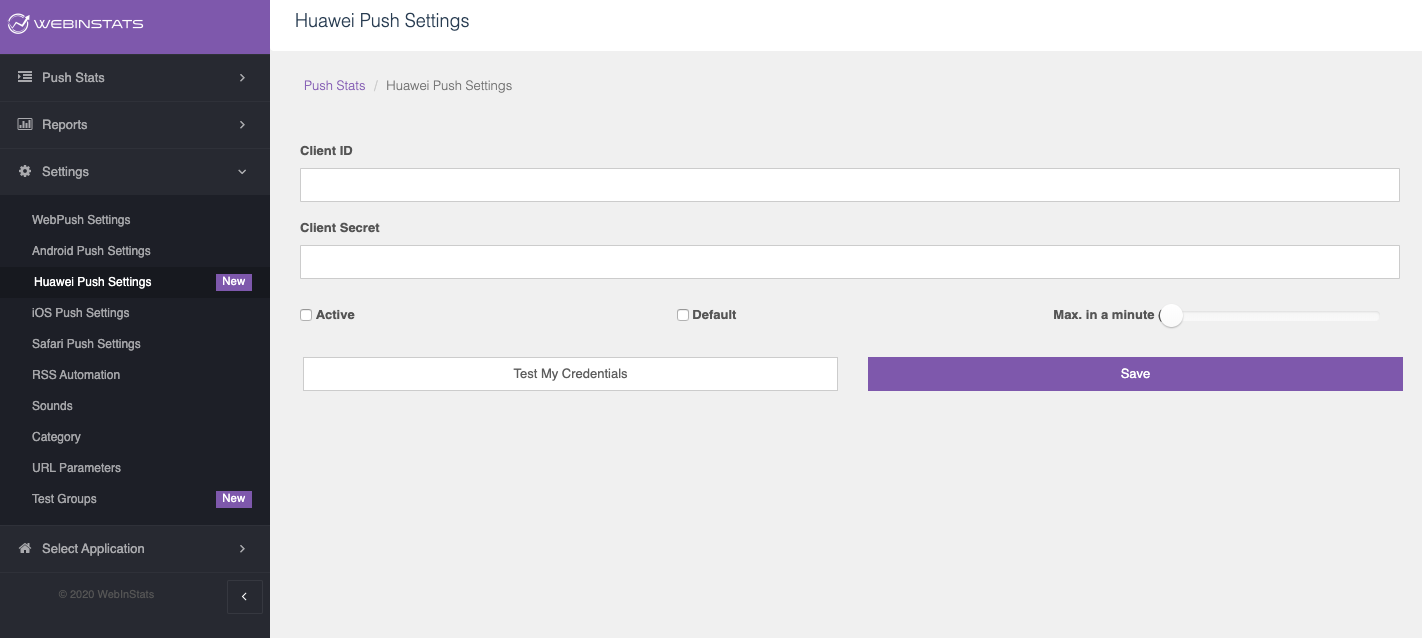
then , you should check active and save your configurations
P.S : System checks the credentials before saving and gives you “Credentials are not correct please check the values and try again” error. You can not save invalid credentials.
Installing Push Notification to the Apps
You can follow the steps below to integrate WebInStats-PushStats application to your apps.
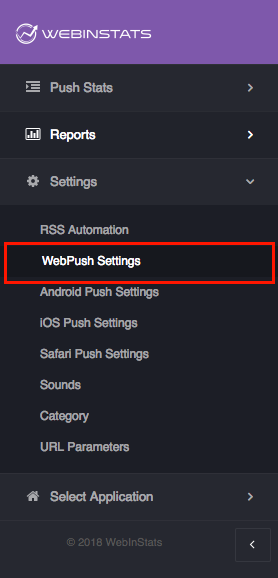
Web
Download manifest.json and sw.js files from webinstats panel and add these files under your domain-root folder.
e.g :
manifest : https://webinstats.com/manifest.json,
service worker : https://webinstats.com/sw.js

Android
Add your FCM application’s configuration file and HMS configuration file below the app section :
Add the codes below to AndroidManifest.xml file between application tags :
<!-- Add your notification icon's source file to AndroidManifest.xml -->
        <!-- before 5.0 API 21 @drawable/file_name -->
           <meta-data
            android:name="push_notification_icon_old"
            android:resource="__icon_source_file"/>
        <!-- 5.0 API 21+ @drawable/file_name -->
           <meta-data
            android:name="push_notification_icon"
            android:resource="@__icon_source_file"/>
        <!-- 8.0 API 26+ -->
        <meta-data
            android:name="com.google.firebase.messaging.default_notification_channel_id"
            android:value="default_notification_channel_id"/>
      <!-- for FCM -->
      <service
      android:name="webinstats.android_wis.WebinstatsMessagingService">
            <intent-filter>
                <action android:name="com.google.firebase.MESSAGING_EVENT"/>
            </intent-filter>
        </service>
      <service
      <!-- for HMS -->
      android:name="webinstats.android_wis.WisHMSMessagingService"
      android:exported="false">
            <intent-filter>
                <action android:name="com.huawei.push.action.MESSAGING_EVENT"/>
            </intent-filter>
        </service>
Complete the following steps in each activity of your application:
import webinstats.android_wis.Webinstats;

// define wiso object as a global object :
Webinstats wiso = new Webinstats("//__YOUR_SUBDOMAIN__.webinstats.com/","__YOUR_COMPANY_ID___","0");
// If you use activity, you must call execute method on onCreate() method in each activity

// If you use fragment activity, you must call execute method on onCreateView() method in each fragment
Map<String,String> map=new HashMap<>();
map.put("p","__THE_PAGENAME_USER_CURRENTLY_VISIT__");
map.put("cuid","__CUSTOMER_ID__"); // LEAVE THIS EMPTY IF USER IS NOT LOGGEDIN
// TWO PARAMETERS BELOW SHOULD BE ON THE PURCHASE PAGE
map.put("trid","__UNIQUE_TRANSACTION_ID__"); // LEAVE THIS EMPTY IF IT'S NOT PURCHASE PAGE
map.put("am","__TRANSACTION_AMOUNT__"); // LEAVE THIS EMPTY IF IT'S NOT PURCHASE PAGE

// for app push enable add line below to map
map.put("_enable_push","1");
// For each activity => call execute function on onCreate() method
wiso.execute(this,map);
// For each fragment activity => call execute function on onCreateView() method F.I. :
wiso.execute(getActivity(),map);
Add the code below to each activities onDestroy method or each Fragment onDestroyView method:
// For each activity => call execute function on onDestroy() method
wiso.onChangeState(this);
// For each fragment activity => call execute function on onDestroyView() method F.I. :
wiso.onChangeState(getActivity());
iOS / Swift
Choose your Appname.target file and enable Push Notifications in Capabilities tab
// To access methods from SDK in your AppDelegate.Swift file add the following line to the beginning of the class.
import iOS_wis
Add the codes below to the related methods. If you don’t use the methods you should add methods to AppDelegate.Swift file
At the end of your didFinishLaunchingWithOptions method, add the following line
func application(_ application: UIApplication, didFinishLaunchingWithOptions launchOptions: [UIApplicationLaunchOptionsKey: Any]?) -> Bool {
        Webinstats("//__YOUR_SUBDOMAIN__.webinstats.com/","___YOUR_COMPANY_ID___","0").register(application, didFinishLaunchingWithOptions: launchOptions)
        return true
    }
Add the following methods, in your AppDelegate.Swift
func application(_ application: UIApplication, didReceiveRemoteNotification userInfo: [AnyHashable : Any], fetchCompletionHandler completionHandler: @escaping (UIBackgroundFetchResult) -> Void) {
   Webinstats("//__YOUR_SUBDOMAIN__.webinstats.com/","___YOUR_COMPANY_ID___","0").didReceiveNotification(application, didReceiveRemoteNotification: userInfo)
    }
func application(_ application: UIApplication,
                     didRegisterForRemoteNotificationsWithDeviceToken deviceToken: Data) {
        let tokenParts = deviceToken.map { data -> String in
            return String(format: "%02.2hhx", data)
        }
        let token = tokenParts.joined()
        Webinstats.registerWithDeviceToken(deviceToken: token)
    }
Paste the code below for each viewcontroller on your app
// You should add Allow Arbitrary Loads = YES under App Transport Security Settings in info.plist file to use the SDK.
// To access methods from SDK in your Swift file add the following line to the begining of the class.
import iOS_wis
// Add the code below for each viewDidLoad() method on viewcontroller

let wiso = Webinstats("//__YOUR_SUBDOMAIN__.webinstats.com/","___YOUR_COMPANY_ID___","0")
var map = [String:String]()
map["p"] = "__THE_PAGENAME_USER_CURRENTLY_VISIT__"
map["cuid"] = "__CUSTOMER_ID__" // LEAVE THIS EMPTY IF USER IS NOT LOGGEDIN
// TWO PARAMETERS BELOW SHOULD BE ON THE PURCHASE PAGE
map["trid"] = "__UNIQUE_TRANSACTION_ID__" // LEAVE THIS EMPTY IF IT'S NOT PURCHASE PAGE
map["am"] = "__TRANSACTION_AMOUNT__" // LEAVE THIS EMPTY IF IT'S NOT PURCHASE PAGE
// for app push enable add line below to map
map["_enable_push"] = "1"
wiso.execute(view: self, localmap: map)
iOS / Objective-C
Choose your Appname.target file and enable Push Notifications in Capabilities tab
// To access methods from SDK in your AppDelegate.m file add the following line to the beginning of the class.
@import iOS_wis
Add the codes below to the related methods. If you don’t use the methods you should add methods to AppDelegate.m file
At the end of your didFinishLaunchingWithOptions method, add the following line
- (BOOL)application:(UIApplication *)application didFinishLaunchingWithOptions:(NSDictionary *)launchOptions {
        [[[Webinstats alloc] init:@"//__YOUR_SUBDOMAIN__.webinstats.com/" :@"___YOUR_COMPANY_ID___" :@"0"] register:application didFinishLaunchingWithOptions:launchOptions];
        return YES;
}
Add the following methods, in your AppDelegate.m
- (void)application:(UIApplication *)application didReceiveRemoteNotification:(NSDictionary *)userInfo fetchCompletionHandler:(void (^)(UIBackgroundFetchResult))completionHandler {
    [[[Webinstats alloc] init:@"//__YOUR_SUBDOMAIN__.webinstats.com/" :@"___YOUR_COMPANY_ID___" :@"0"] didReceiveNotification:application didReceiveRemoteNotification:userInfo];
}

- (void)application:(UIApplication *)application didRegisterForRemoteNotificationsWithDeviceToken:(NSData *)deviceToken{
    NSString * deviceTokenString = [[[[deviceToken description]
                                      stringByReplacingOccurrencesOfString: @"<" withString: @""] stringByReplacingOccurrencesOfString: @">" withString: @""]
                                    stringByReplacingOccurrencesOfString: @" " withString: @""];
    NSLog(@"token : %@",deviceTokenString);
    [Webinstats registerWithDeviceTokenWithDeviceToken:deviceTokenString];
}

- (BOOL)application:(UIApplication *)app openURL:(NSURL *)url options:(NSDictionary<UIApplicationOpenURLOptionsKey,id> *)options{
    [[[Webinstats alloc] init:@"//__YOUR_SUBDOMAIN__.webinstats.com/" :@"___YOUR_COMPANY_ID___" :@"0"] saveTestParametersWithUrl:url];
    return YES;
}
Paste the code below for each viewcontroller on your app
// You should add Allow Arbitrary Loads = YES under App Transport Security Settings in info.plist file to use the SDK.
// To access methods from SDK in your Objective-C file add the following line to the begining of the class.
@import iOS_wis
// Add the code below for each -(void)viewDidLoad method on viewcontroller
Webinstats* wiso = [[Webinstats alloc] init:@"//__YOUR_SUBDOMAIN__.webinstats.com/" :@"___YOUR_COMPANY_ID___" :@"0"];
NSMutableDictionary *map = [[NSMutableDictionary alloc] init];
[map setObject:@"__THE_PAGENAME_USER_CURRENTLY_VISIT__" forKey:@"p"];
[map setObject:@"__CUSTOMER_ID__" forKey:@"cuid"]; // LEAVE THIS EMPTY IF USER IS NOT LOGGEDIN
// TWO PARAMETERS BELOW SHOULD BE ON THE PURCHASE PAGE
[map setObject:@"__UNIQUE_TRANSACTION_ID__" forKey:@"trid"]; // LEAVE THIS EMPTY IF IT'S NOT PURCHASE PAGE
[map setObject:@"__TRANSACTION_AMOUNT__" forKey:@"am"]; // LEAVE THIS EMPTY IF IT'S NOT PURCHASE PAGE
[map setObject:@"1" forKey:@"_enable_push"];
[wiso executeWithView:self localmap:map];
iOS 10 Rich Push Notifications
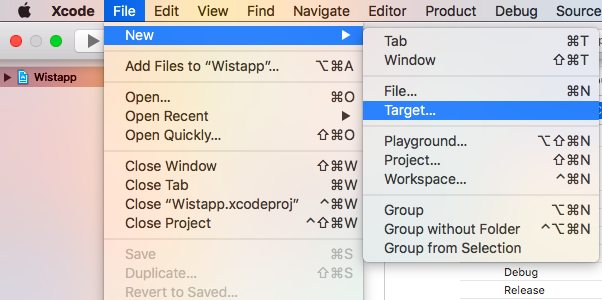
You should add NotificationExtension.target add your project.
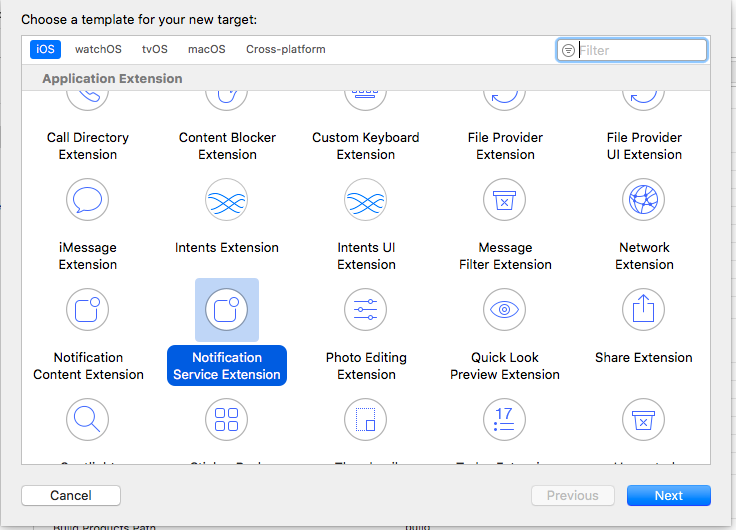
Step 1 : File —> New —> Target -> Choose Notification Extension
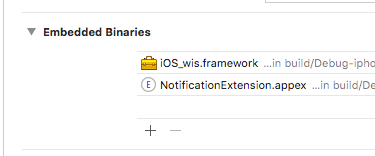
In the general settings for the new target,add iOS_wis.framework.
Add the following code in your notification extension file
Swift
override func didReceive(_ request: UNNotificationRequest, withContentHandler contentHandler: @escaping (UNNotificationContent) -> Void) {
        self.contentHandler = contentHandler
        bestAttemptContent = (request.content.mutableCopy() as? UNMutableNotificationContent)
        if let bestAttemptContent = bestAttemptContent {
            contentHandler(Webinstats("//__YOUR_SUBDOMAIN__.webinstats.com/","___YOUR_COMPANY_ID___","0").didReceiveNotificationExtension(request, bestAttemptContent))
        }
    }
Objective-C
- (void)didReceiveNotificationRequest:(UNNotificationRequest *)request withContentHandler:(void (^)(UNNotificationContent * _Nonnull))contentHandler {
    self.contentHandler = contentHandler;
    self.bestAttemptContent = [request.content mutableCopy];
    if(_bestAttemptContent){
        contentHandler([[[Webinstats alloc] init:@"//__YOUR_SUBDOMAIN__.webinstats.com/" :@"___YOUR_COMPANY_ID___" :@"0"] didReceiveNotificationExtension:request :_bestAttemptContent]);
    }
}
Add NotificationExtension to Appname.target -> General Settings-> Embedded Libraries.
Customizing default parameters
Default Parameters :
| Param Name | Default Value | Description | Sample Usage |
|---|---|---|---|
| _isexec | true | if this parameter’s value is true SDK automatically send request to the WebInStats server. You can set this parameter to false and you can call wiso._execute(); method whenever you want. | You should add {_isexec:false}, and you can call wiso._execute(); method whenever you want |
| _ucisd | false | If Local Storage is disable on the browser (F.I. on private mode) you can set this parameter true to use cookie | To able to store something when local storage disabled, you can add {_ucisd:true}, line to the script. |
| _cd | ” | You can set cookie domain name to this field. if this parameter is empty system use *.domainname.com. | To change cookie domain to my.webinstats.com you can add {_cd:’my.webinstats.com’}, line to the script code. |
| _req_to | 6000 | Server request time out parameter. Default value is (6000=6 seconds) If server doesn’t respond in 6 seconds system automatically close the connection. | To change timeout to 4 seconds you can add : {_req_to:4000}, line to the script code. |
| _fc | false | You can cache some css and js files on Local Storage to decrease the network request. You should use this parameter carefully because it increases stored data on local storage | To activate it you can add {_fc:true}, line to the script code. |
| _fct | 1440 | if _fc=true (file cache enabled) you can customize timeout for local file cache as minute (60=1 hour) | To change the file cache timeout value you can add {_fc:true}, {_fct:120}, // 2 hours line to the script code. |
| _fcfs | 40 | if _fc=true (file cache enabled) you can set maximum cache limit. Default value is 40 KB | To change the file cache size limit value you can add {_fc:true}, {_fct:2880}, // 2 days {_fcfs:20}, // Max 20 KB line to the script code. |
| _cview | true | You can disable Viewability feature using this parameter. If this value set to true system automatically count views when banners are visible | To disable it you can add {_cview:false}, line to the script code. |
| ps | ‘/’ | You can change Page separator parameter. This parameter allows you to set campaigns on sub pages. If your page structure is like “Product:Mobile Phones:Iphone” you can use : as page separator and you can set campaign on Product:Mobile Phones:@all pages. | To change it to “:” you can add {ps:”:”}, line to the script code. |
| _cstto | 1440 | Default click cookie timeout parameter. | To change it to 1 hour you can add {_cstto:60}, line to the script code. |
| _csttoi | 60 | Default impression cookie timeout parameter. | To change impression cookie timeout to 30 minutes you can add {_csttoi:30}, line to the script code. |
| _uto | 2628000 | Default unique visitor cookie timeout as minute. Default value is 5 years. | To change it to 1 year you can add : {_uto:525600}, line to the script code. |
| _vto | 30 | Default visit timeout. | to change visit timeout to 60 minutes you can add {_vto:60}, line to the script code. |
| _runi | null | You can run any function on banner impression. | To send all banner impressions to the google analytics as event you can add {_runi:function(a){ga(ga.getAll()[0].get(“name”)+”.send”,”event”,”WIS”,”impression”,a.cn+”-“+a.n,!1)}}, line to the script code. |
| _runv | null | You can run any function on banner view. | To send all banner views to the google analytics as event you can add {_runv:function(a){ga(ga.getAll()[0].get(“name”)+”.send”,”event”,”WIS”,”view”,a.cn+”-“+a.n,!1)}}, line to the script code. |
| _runc | null | You can run any function on banner click. | To send all banner clicks to the google analytics as event you can add {_runc:function(a){ga(ga.getAll()[0].get(“name”)+”.send”,”event”,”WIS”,”click”,a.cn+”-“+a.n,!1)}}, line to the script code. |
| _runa | null | You can run any function on actions. | To send all actions to the google analytics as event you can add {_runa:function(a){ga(ga.getAll()[0].get(“name”)+”.send”,”event”,”WIS”,”action”,a.n,!1)}}, line to the script code. |
| _runar | null | You can run any function on action cancellation. | To send all action cancellation to the google analytics as event you can add {_runar:function(a){ga(ga.getAll()[0].get(“name”)+”.send”,”event”,”WIS”,”actionremove”,a.n,!1)}}, line to the script code. |
| _sck | false | if your website is https WebInStats create secure cookies to track all campaigns performance | To create secure cookies You can add {_sck:true}, line to the script code. |
You can see the steps to customize default _vto (Visit Timeout) parameter to 60 minutes and _req_to (Request Timeout) parameter to 10000 ms (10 sn) :
Web
Please copy this code to all of the pages on your website before the </body> tag. (Also you can add the code to the Tag Manager)
<script>
window.wiso = window.wiso || [];
window.wiso.push(
 {s:"__YOUR_COMPANY_ID___"},
 {_cburl:"//__YOUR_SUBDOMAIN__.webinstats.com/"},
 {p:"__THE_PAGENAME_USER_CURRENTLY_VISIT__"},
 {cuid:"__CUSTOMER_ID__"}, // LEAVE THIS EMPTY IF USER IS NOT LOGGEDIN
// TWO PARAMETERS BELOW SHOULD BE ON THE PURCHASE PAGE
 {trid:"__UNIQUE_TRANSACTION_ID__"}, // LEAVE THIS EMPTY IF IT'S NOT PURCHASE PAGE
 {am:"__TRANSACTION_AMOUNT__"}, // LEAVE THIS EMPTY IF IT'S NOT PURCHASE PAGE

 {_vto:"60"},
 {_req_to:"10000"}
);
(function() {var _wis = document.createElement('script');_wis.type = 'text/javascript';_wis.async = true;
_wis.src='//dbfukofby5ycr.cloudfront.net/a9/js/dlc1.50.js';var s = document.getElementsByTagName('script')[0];
s.parentNode.insertBefore(_wis, s); })();
</script>
Android
Add the line below to AndroidManifest.xml file :
<uses-permission android:name="android.permission.INTERNET"></uses-permission>
Add the code below to each activities activity tag :
<activity android:name=".MainActivity"
 android:configChanges="orientation|screenSize">
</activity>
Complete the following steps in each activity of your application:
import webinstats.android_wis.Webinstats;

// define wiso object as a global object :
Webinstats wiso = new Webinstats("//__YOUR_SUBDOMAIN__.webinstats.com/","__YOUR_COMPANY_ID___","0");
// If you use activity, you must call execute method on onCreate() method in each activity

// If you use fragment activity, you must call execute method on onCreateView() method in each fragment
Map<String,String> map=new HashMap<>();
map.put("p","__THE_PAGENAME_USER_CURRENTLY_VISIT__");
map.put("cuid","__CUSTOMER_ID__"); // LEAVE THIS EMPTY IF USER IS NOT LOGGEDIN
// TWO PARAMETERS BELOW SHOULD BE ON THE PURCHASE PAGE
map.put("trid","__UNIQUE_TRANSACTION_ID__"); // LEAVE THIS EMPTY IF IT'S NOT PURCHASE PAGE
map.put("am","__TRANSACTION_AMOUNT__"); // LEAVE THIS EMPTY IF IT'S NOT PURCHASE PAGE

map.put("_vto","60");
map.put("_req_to","10000");
// For each activity => call execute function on onCreate() method
wiso.execute(this,map);
// For each fragment activity => call execute function on onCreateView() method F.I. :
wiso.execute(getActivity(),map);
Add the code below to each activities onDestroy method or each Fragment onDestroyView method:
// For each activity => call execute function on onDestroy() method
wiso.onChangeState(this);
// For each fragment activity => call execute function on onDestroyView() method F.I. :
wiso.onChangeState(getActivity());
iOS / Swift
Paste the code below for each viewcontroller on your app
// You should add Allow Arbitrary Loads = YES under App Transport Security Settings in info.plist file to use the SDK.
// To access methods from SDK in your Swift file add the following line to the begining of the class.
import iOS_wis
// Add the code below for each viewDidLoad() method on viewcontroller

let wiso = Webinstats("//__YOUR_SUBDOMAIN__.webinstats.com/","___YOUR_COMPANY_ID___","0")
var map = [String:String]()
map["p"] = "__THE_PAGENAME_USER_CURRENTLY_VISIT__"
map["cuid"] = "__CUSTOMER_ID__" // LEAVE THIS EMPTY IF USER IS NOT LOGGEDIN
// TWO PARAMETERS BELOW SHOULD BE ON THE PURCHASE PAGE
map["trid"] = "__UNIQUE_TRANSACTION_ID__" // LEAVE THIS EMPTY IF IT'S NOT PURCHASE PAGE
map["am"] = "__TRANSACTION_AMOUNT__" // LEAVE THIS EMPTY IF IT'S NOT PURCHASE PAGE

map["_vto"] = "60"
map["_req_to"] = "10000"
wiso.execute(view: self, localmap: map)
iOS / Objective-C
Paste the code below for each viewcontroller on your app
// You should add Allow Arbitrary Loads = YES under App Transport Security Settings in info.plist file to use the SDK.
// To access methods from SDK in your Objective-C file add the following line to the begining of the class.
@import iOS_wis
// Add the code below for each -(void)viewDidLoad method on viewcontroller

Webinstats* wiso = [[Webinstats alloc] init:@"//__YOUR_SUBDOMAIN__.webinstats.com/" :@"___YOUR_COMPANY_ID___" :@"0"];
NSMutableDictionary *map = [[NSMutableDictionary alloc] init];
[map setObject:@"__THE_PAGENAME_USER_CURRENTLY_VISIT__" forKey:@"p"];
[map setObject:@"__CUSTOMER_ID__" forKey:@"cuid"]; // LEAVE THIS EMPTY IF USER IS NOT LOGGEDIN
// TWO PARAMETERS BELOW SHOULD BE ON THE PURCHASE PAGE
[map setObject:@"__UNIQUE_TRANSACTION_ID__" forKey:@"trid"]; // LEAVE THIS EMPTY IF IT'S NOT PURCHASE PAGE
[map setObject:@"__TRANSACTION_AMOUNT__" forKey:@"am"]; // LEAVE THIS EMPTY IF IT'S NOT PURCHASE PAGE

[map setObject:@"60" forKey:@"_vto"];
[map setObject:@"10000" forKey:@"_req_to"];
[wiso executeWithView:self localmap:map];
Sending extra parameters
You can send extra parameters to WebInStats system and you can use this parameters to create new campaigns. You must use correct parameter name if it’s possible you can use prefix for the extra parameters. F.I. if your company name is Example Company you can use exa prefix to easily remember the custom parameters. You must follow the rules below to create a new variable:
- Parameter name can not start with wis_ .
- Parameter name can not start with _.
- Parameter name can not start with numeric value.
- Parameter name can not contain special character except _.
- Parameter name can not contain space character.
- Parameter name can not have special Turkish, german..etc characters. (Such as üiçğş..).
- Parameter name can be maximum 20 characters. Preferably minimum 5 characters.
WRONG PARAMETER NAME SAMPLES
wis_gender : (Parameter name can not start with wis_)
_gender : (Parameter name can not start with _.)
s : (It’s a special WebInStats parameter. You can see system parameters by clicking this link.)
segment.3 : (Parameter name can not contain special character except _)
segment[3] : (Parameter name can not contain special character except _)
segment(3) : (Parameter name can not contain special character except _)
segment-3 : (Parameter name can not contain special character except _)
eski_segment_3_degeri :(Parameter name can be maximum 20 characters.)
3segment : (Parameter name can not start with numeric value)
doğumtarihi : (Parameter name can not have special Turkish, german..etc characters. (Such as üiçğş..))
dogum tarihi : (Parameter name can not contain space character).
CORRECT PARAMETER NAME SAMPLES :
cinsiyet
segment3
segment_3
dogumtarihi
dogum_tarihi
segment3value
F.I. We want to send user’s gender and total transaction count. Let’s assume that we want to use exagender and exatranscnt parameter names for these fields.
Web
Please copy this code to all of the pages on your website before the </body> tag. (Also you can add the code to the Tag Manager)
<script>
window.wiso = window.wiso || [];
window.wiso.push(
 {s:"__YOUR_COMPANY_ID___"},
 {_cburl:"//__YOUR_SUBDOMAIN__.webinstats.com/"},
 {p:"__THE_PAGENAME_USER_CURRENTLY_VISIT__"},
 {cuid:"__CUSTOMER_ID__"}, // LEAVE THIS EMPTY IF USER IS NOT LOGGEDIN
// TWO PARAMETERS BELOW SHOULD BE ON THE PURCHASE PAGE
 {trid:"__UNIQUE_TRANSACTION_ID__"}, // LEAVE THIS EMPTY IF IT'S NOT PURCHASE PAGE
 {am:"__TRANSACTION_AMOUNT__"}, // LEAVE THIS EMPTY IF IT'S NOT PURCHASE PAGE

 {exagender:"Female"},
 {exatranscnt:"765"}
);
(function() {var _wis = document.createElement('script');_wis.type = 'text/javascript';_wis.async = true;
_wis.src='//dbfukofby5ycr.cloudfront.net/a9/js/dlc1.50.js';var s = document.getElementsByTagName('script')[0];
s.parentNode.insertBefore(_wis, s); })();
</script>
Android
Add the line below to AndroidManifest.xml file :
<uses-permission android:name="android.permission.INTERNET"></uses-permission>
Add the code below to each activities activity tag :
<activity android:name=".MainActivity"
 android:configChanges="orientation|screenSize">
</activity>
Complete the following steps in each activity of your application:
import webinstats.android_wis.Webinstats;

// define wiso object as a global object :
Webinstats wiso = new Webinstats("//__YOUR_SUBDOMAIN__.webinstats.com/","__YOUR_COMPANY_ID___","0");
// If you use activity, you must call execute method on onCreate() method in each activity

// If you use fragment activity, you must call execute method on onCreateView() method in each fragment
Map<String,String> map=new HashMap<>();
map.put("p","__THE_PAGENAME_USER_CURRENTLY_VISIT__");
map.put("cuid","__CUSTOMER_ID__"); // LEAVE THIS EMPTY IF USER IS NOT LOGGEDIN
// TWO PARAMETERS BELOW SHOULD BE ON THE PURCHASE PAGE
map.put("trid","__UNIQUE_TRANSACTION_ID__"); // LEAVE THIS EMPTY IF IT'S NOT PURCHASE PAGE
map.put("am","__TRANSACTION_AMOUNT__"); // LEAVE THIS EMPTY IF IT'S NOT PURCHASE PAGE

map.put("exagender","Female");
map.put("exatranscnt","765");
// For each activity => call execute function on onCreate() method
wiso.execute(this,map);
// For each fragment activity => call execute function on onCreateView() method F.I. :
wiso.execute(getActivity(),map);
Add the code below to each activities onDestroy method or each Fragment onDestroyView method:
// For each activity => call execute function on onDestroy() method
wiso.onChangeState(this);
// For each fragment activity => call execute function on onDestroyView() method F.I. :
wiso.onChangeState(getActivity());
iOS / Swift
Paste the code below for each viewcontroller on your app
// You should add Allow Arbitrary Loads = YES under App Transport Security Settings in info.plist file to use the SDK.
// To access methods from SDK in your Swift file add the following line to the begining of the class.
import iOS_wis
// Add the code below for each viewDidLoad() method on viewcontroller

let wiso = Webinstats("//__YOUR_SUBDOMAIN__.webinstats.com/","___YOUR_COMPANY_ID___","0")
var map = [String:String]()
map["p"] = "__THE_PAGENAME_USER_CURRENTLY_VISIT__"
map["cuid"] = "__CUSTOMER_ID__" // LEAVE THIS EMPTY IF USER IS NOT LOGGEDIN
// TWO PARAMETERS BELOW SHOULD BE ON THE PURCHASE PAGE
map["trid"] = "__UNIQUE_TRANSACTION_ID__" // LEAVE THIS EMPTY IF IT'S NOT PURCHASE PAGE
map["am"] = "__TRANSACTION_AMOUNT__" // LEAVE THIS EMPTY IF IT'S NOT PURCHASE PAGE

map["exagender"] = "Female"
map["exatranscnt"] = "765"
wiso.execute(view: self, localmap: map)
iOS / Objective-C
Paste the code below for each viewcontroller on your app
// You should add Allow Arbitrary Loads = YES under App Transport Security Settings in info.plist file to use the SDK.
// To access methods from SDK in your Objective-C file add the following line to the begining of the class.
@import iOS_wis
// Add the code below for each -(void)viewDidLoad method on viewcontroller

Webinstats* wiso = [[Webinstats alloc] init:@"//__YOUR_SUBDOMAIN__.webinstats.com/" :@"___YOUR_COMPANY_ID___" :@"0"];
NSMutableDictionary *map = [[NSMutableDictionary alloc] init];
[map setObject:@"__THE_PAGENAME_USER_CURRENTLY_VISIT__" forKey:@"p"];
[map setObject:@"__CUSTOMER_ID__" forKey:@"cuid"]; // LEAVE THIS EMPTY IF USER IS NOT LOGGEDIN
// TWO PARAMETERS BELOW SHOULD BE ON THE PURCHASE PAGE
[map setObject:@"__UNIQUE_TRANSACTION_ID__" forKey:@"trid"]; // LEAVE THIS EMPTY IF IT'S NOT PURCHASE PAGE
[map setObject:@"__TRANSACTION_AMOUNT__" forKey:@"am"]; // LEAVE THIS EMPTY IF IT'S NOT PURCHASE PAGE

[map setObject:@"Female" forKey:@"exagender"];
[map setObject:@"765" forKey:@"exatranscnt"];
[wiso executeWithView:self localmap:map];
Inline Banner Integration on Apps
Inline Banners are embedded banner areas on your apps. You can define inline banner containers in your apps and manage this containers’ content using WebInStats Admin Panel without sending a new release to AppStore or Google Play. You can show different content to different users and customize the content by segment, by user Type or by any parameter you defined in WebInStats SDK.
Android
You should add a container with FrameLayout type to your app and you should define an id to this container.
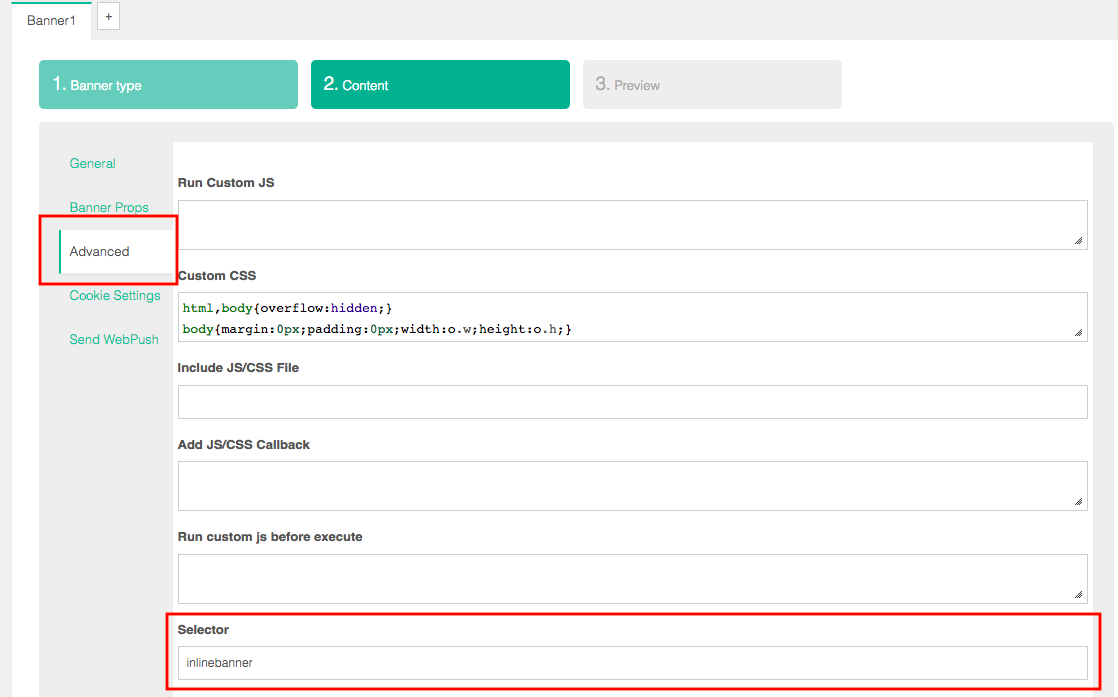
To manage this containers’ content, you can define id to “selector” field on WebInStats Admin Panel’s Advanced tab.
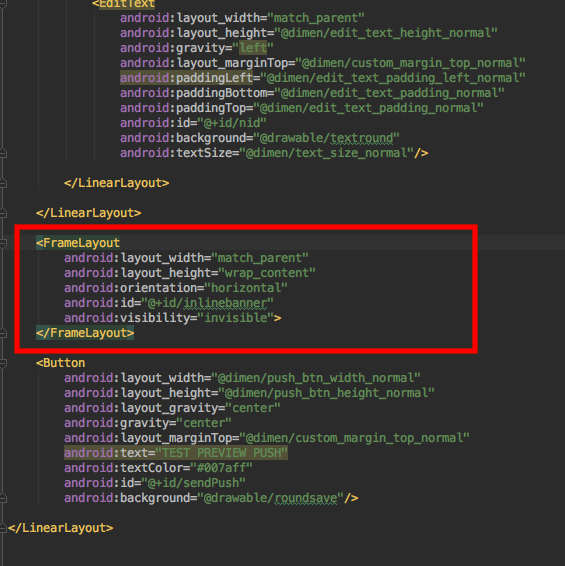
<FrameLayout
        android:layout_width="match_parent"
        android:layout_height="wrap_content"
        android:orientation="horizontal"
        android:id="@+id/inlinebanner"
        android:visibility="invisible">
</FrameLayout>
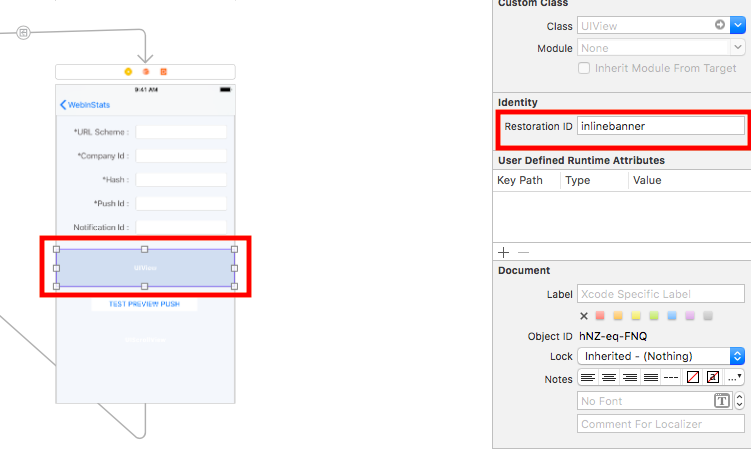
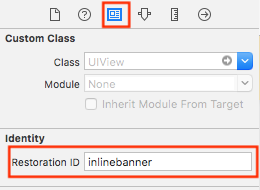
IOS
You should add a container on the page and you should set id to restorationidentifier field. You should use this id field on WebInStats Admin Panel to manage this containers’ content.
Important : You can define container as hidden and you can give 0 to the height value. Then you can create a new function to set banner’s height and you can trigger this function on WebInStats Admin Panel. If you define a content for the specific container WebInStats SDK change the container’s content then run the customized function (defined by your developers) to make it visible. You can read customizable functions section to see detailed information.
Customizable functions for your apps
You can create customized functions to trigger on banner’s impression or click.
F.I. If you want to apply a coupon code to the shopping cart when user click the banner, you can follow the steps below :
Android
You can add a create_discount method to the ShoppingCart_Activity class. Coupon code will be automatically assigned to the “run_parameter” variable in JSONObject. You can use this coupon code and call your functions to apply the coupon code.
public void create_discount(JSONObject object){
        String code = object.getString("run_parameter");
        trigger_to_discount_func(code);
    }
IOS
You can add a create_discount method to the ShoppingCart_ViewController class. Coupon code will be automatically assigned to the “run_parameter” variable in parameters. You can use this coupon code and call your functions to apply the coupon code.
func createDiscount(_ parameters : [String:Any]) {
	var code : String = parameters[“run_parameter”]
	trigger_to_discount_func(code : String)
}
Following the action of the user makes it easy to optimize your applications. In addition to the standard actions such as user registrations, purchases, you can add the following code block to the action area that you want to follow is triggered.
Android
wiso.createEvent("Action_Name");
IOS
wiso.createEvent(eventname: "Action_Name")
Activating preview mode on Apps
You can download WebInStats Wistapp app on App Store or Google Play to see your campaigns on preview mode.
You should add code blocks below to your apps.
Android
Please add the code below to onCreate() method on activity classes where you defined deep link definitions.
@Override
protected void onCreate(@Nullable Bundle savedInstanceState) {
    super.onCreate(savedInstanceState);
    setContentView(R.layout.deep_link);
    Intent appLinkIntent = getIntent();
    Uri appLinkData = appLinkIntent.getData();
    Webinstats wobj = new Webinstats("//__YOUR_SUBDOMAIN__.webinstats.com/","___YOUR_COMPANY_ID___","0");
    wobj.saveTestParameters(this,appLinkData);
}
IOS / Swift
Please add the code below to application method on AppDelegate.swift file where you receive deep link request.
func application(_ application:UIApplication, open url:URL,sourceApplication:String?,annotation:Any)->Bool{
    Webinstats("//__YOUR_SUBDOMAIN__.webinstats.com/","___YOUR_COMPANY_ID___","0").saveTestParameters(url: url)
    return true
}
IOS / Objective-C
Please add the code below to application method on AppDelegate.m file where you receive deep link request.
- (BOOL)application:(UIApplication *)app openURL:(NSURL *)url options:(NSDictionary<UIApplicationOpenURLOptionsKey,id> *)options{
    [[[Webinstats alloc] init:@"//__YOUR_SUBDOMAIN__.webinstats.com/" :@"___YOUR_COMPANY_ID___" :@"0"] saveTestParametersWithUrl:url];
    return YES;
}